GraphQL API
Raito uses GraphQL as its API paradigm to programmatically query and manipulate the model in Raito Cloud. This document explains how to use the GraphQL API, based on a couple of examples.
At this time, the GraphQL API is not fully stabilized and is subject for change. So while it is allowed to use it, your code can break at any point in time.
We will use Postman to describe how queries should be executed.
Setting up Postman
Raito uses token-based authentication. This means that a token needs to be acquired first. This token is then used to authentication against the API.
To make things easier, we will do this by using Pre-request Scripts in Postman.
Creating an environment
The cleanest way, is to use environments in Postman. Environments are a set of variables to be used when writing requests.
- In Postman, go to
Environments - Click
+to create a new one and give it a good name. For example,Raito - Create the following variables:
- CLIENT_ID: leave the type on
default. The Initial Value should be the client id of your Raito instance. You can request this from Raito via [email protected] - USERNAME: leave the type on
default. The Initial Value should be the username of the Raito user you want to use to do the requests. This user needs to have the correct permissions to execute the Graphql queries you want. - PASSWORD: set the type to ‘secret’. The Initial Value should be the password for the user.

- CLIENT_ID: leave the type on
- Make sure to
Savethe environment.
Creating a collection
Next, we’ll create a Collection and implement the script to fetch the authentication token to pass with every request.
- In Postman, go to
Collections - Click on
+to add a new Collection and give it a good name. For example,Raito - In the
Pre-request Scripttab, enter the following script:
const echoPostRequest = {
  url: 'https://cognito-idp.eu-central-1.amazonaws.com/',
  method: 'POST',
  header: {
    'Content-Type': 'application/x-amz-json-1.1',
    'X-Amz-Target': 'AWSCognitoIdentityProviderService.InitiateAuth'
  },
  body: {
    mode: 'application/json',
    raw: JSON.stringify(
      {
        "AuthParameters": {
          "USERNAME": pm.environment.get("USERNAME"),
          "PASSWORD": pm.environment.get("PASSWORD")
        },
        "AuthFlow": "USER_PASSWORD_AUTH",
        "ClientId": pm.variables.get('CLIENT_ID')
      })
  }
};

var getToken = true;
if (!pm.environment.get('ACCESS_TOKEN_EXPIRY') || !pm.environment.get('ACCESS_TOKEN')) {
  console.log('Token or expiry date are missing')
} else if (pm.environment.get('ACCESS_TOKEN_EXPIRY') <= (new Date()).getTime()) {
  console.log('Token is expired')
} else {
  getToken = false;
  console.log('Token and expiry date are all good');
}

if (getToken === true) {
  pm.sendRequest(echoPostRequest, function (err, res) {
    console.log(err ? err : res.json());
    if (err === null) {
      console.log('Saving the token: '+responseJson)
      var responseJson = res.json();
      pm.environment.set('ACCESS_TOKEN', responseJson.AuthenticationResult.IdToken)

      var expiryDate = new Date();
      expiryDate.setSeconds(expiryDate.getSeconds() + responseJson.AuthenticationResult.ExpiresIn);
      pm.environment.set('ACCESS_TOKEN_EXPIRY', expiryDate.getTime());
    }
  });
}
Make sure to click Save.
Executing a request
Now, we are ready to try out a first request.
- Hover over the name of the collection you just created in the list on the right
- Click the
…(three dots) - Click the
Add Requestaction in the popup menu - Give the request a name. For example,
Raito Test. - Switch the HTTP method to
POST - Fill in the request URL: https://api.raito.cloud/query
-
In the
Headerstab, add an additional header with keyAuthorizationand valuetoken. The header section should then look something like this: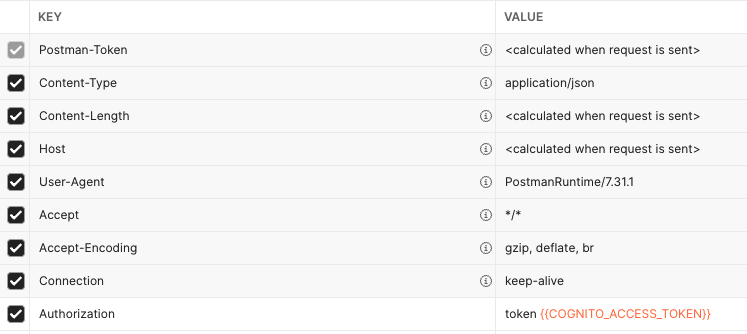
- In the Body tab, select the type ‘GraphQL’ and enter your first GraphQL query. For example,
query Test {
    currentUser {
        name
    }
}
will return the name of the currently authenticated user.
Postman also supports fetching the GraphQL schema so that it can provide auto-complete functionality while editing the request body. You can do this by clicking the ‘refresh’ icon as seen on the bottom-right of this screenshot (if it didn’t already automatically fetch it):

Examples
Fetching Access Providers
In the following query, we fetch the first 10 AccessProviders that contain the string TEST. For each of these AccessProviders, we also get the first 10 users that this AccessProvider provides access to.
query GetAccessProviders {
    accessProviders(limit: 10, filter: {search: "TEST"}) {
        ... on PagedResult {
            edges {
                node {
                    ... on AccessProvider {
                        name
                        whoUsers(limit: 10) {
                            ... on PagedResult {
                                edges {
                                    node {
                                        __typename
                                        ... on AccessWhoItem {
                                            item {
                                                ... on User {
                                                    name
                                                    email
                                                }
                                            }
                                        }
                                    }
                                }
                            }
                        }
                    }
                }
            }
        }
    }
}
Adding users to an AccessProvider
To add users to an Access Provider, the mutation addWhoToAccessProvider is provided.
In the example below, we’ll add the user with id user123 to the access provider with id abc123.
mutation AddWhoToAccessProvider($input: [WhoItemInput!]) {
    addWhoToAccessProvider(id: "abc123", toAdd: $input) {
        ... on AccessProvider {
            name
        }
    }
}
Here we make use of variables, so in the GraphQL variables field in Postman, enter the JSON that will represent the [WhoItemInput!] input array:
{
    "input": [
        {
            "user": "user123"
        }
    ]
}
Removing users from an AccessProvider
Similarly, we can also remove users from an Access Provider using mutation removeWhoFromAccessProvider.
In the example below, we’ll remove the user with id user123 from the access provider with id abc123.
mutation RemoveWhoFromAccessProvider {
    removeWhoFromAccessProvider(id: "abc123", toRemove: ["user123"]) {
        ... on AccessProvider {
            name
        }
    }
}